Updated on Kisan Patel
This post will explain you how to use code first migrations to include our model and update the database in ASP.NET MVC application.
So lets first create new ASP.NET MVC internet application and name it to “MVCMigrationsDemo”.
Now, Lets add the Student class in Models folder and also add three property as shown in below code:
public class Student
{
    public int Id { get; set; }

    [Required]
    public string Name { get; set; }

    public int RollNo { get; set; }
}
Now, add the StudentContext class inside the Models folder and also add a DbSet property of the entity type Student inside this context class as shown in below code:
public class StudentContext : DbContext
{
    public DbSet<Student> Students { get; set; }
}
In web.config file we have added below connectionString:
<connectionStrings>
      <add name="StudentContext" connectionString="Data Source=./SQLExpress;Initial Catalog=Test;Integrated Security=SSPI;" providerName="System.Data.SqlClient" />
</connectionStrings>

After that first we need to enabling migrations. To do this open Package Manager Console by go to Tools=>NuGet Package Manager=>Package Manager Console and type Enable-Migrations command into it. we will observe that a Migrations folder has been created in the project with two source files, one for the initial creation of the database and the other for the configuration(configuration.cs).
Note: you can also target the specific DbContext class by using following code:
Enable-Migrations -ContextTypename MVCMigrationsDemo.Models.StudentContext

Now, open the configuration.cs file and change the AutomaticMigrationsEnabled property’s value to true using the following line of code:
AutomaticMigrationsEnabled = true
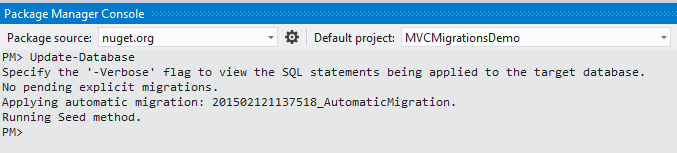
Now, we can apply the changes from our code to database with the command Update-Database that we will type into and execute with the Package Manager Console. If we want more details on what is happening, we can also execute this command with the -Verbose flag as shown in following line:
Update-Database –Verbose
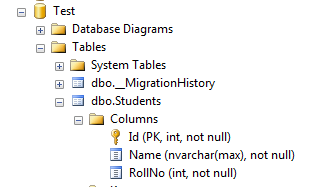
Now check that database has been properly generated, so we should open our SQL Server Management Studio and changes will be reflected.
Now, lets we want to add the new column Course into Student table so execute the Add-Migration command, followed by tge name we want to give to this code migration. we will use the name StudentCourse.
Add-Migration StudentCourse

Now a new file has appeared in our Migrations folder, named StudentCourse.cs, prefixed with a timestamp that will help us with the ordering. Now open it,
In StudentCourse.cs, we can see the Up and Down methods that will be invoked when needed. We modify them to do what we want. For example, we want to add Course column to Students table.
public partial class StudentCourse : DbMigration
{
      public override void Up()
      {
          AddColumn("dbo.Students", "Course", c => c.String(nullable: false));
      }

      public override void Down()
      {
          DropColumn("dbo.Students", "Course");
      }
}
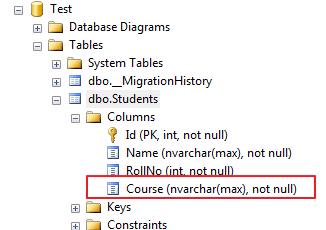
Now, update the database with the Update-Database command. Go on and execute it. You can see Course column has been added in the Students table.
Note that we can add multiple migrations by executing Add-Migration whenever we need to change the database.
If we want to go back to the previous version of migration, we will use the Update-Database command together with the -TargetMigration flag.
Update-Database -TargetMigration:"InitialCreate"
This will not execute properly as it will produce a loss of data. We must add the –Force flag to execute it without problems.
Update-Database -TargetMigration:"InitialCreate" -Force
We can also update the database to the specific migration state with the following command.
Update-Database -TargetMigration:"StudentCourse"