Updated on Kisan Patel
In this tutorial, you will learn how to create standalone WPF application and also learn how to work with WPF application windows that hold other elements and controls of applications.
Whenever you create WPF application, a window is automatically included in the applications. Note that a WPF window is an instance of the Window class.
First Open Visual Studio IDE then click the New Project link on Start Page or go to File=>New=>Project option. The New Project dialog box appears as shown in below screenshot.

Next, Select Visual C#, then WPF Application Template from the installed templates. Enter a name “WPFApp” in the Name text box and click the OK button. after that visual studio will prepare solution for WPF application.
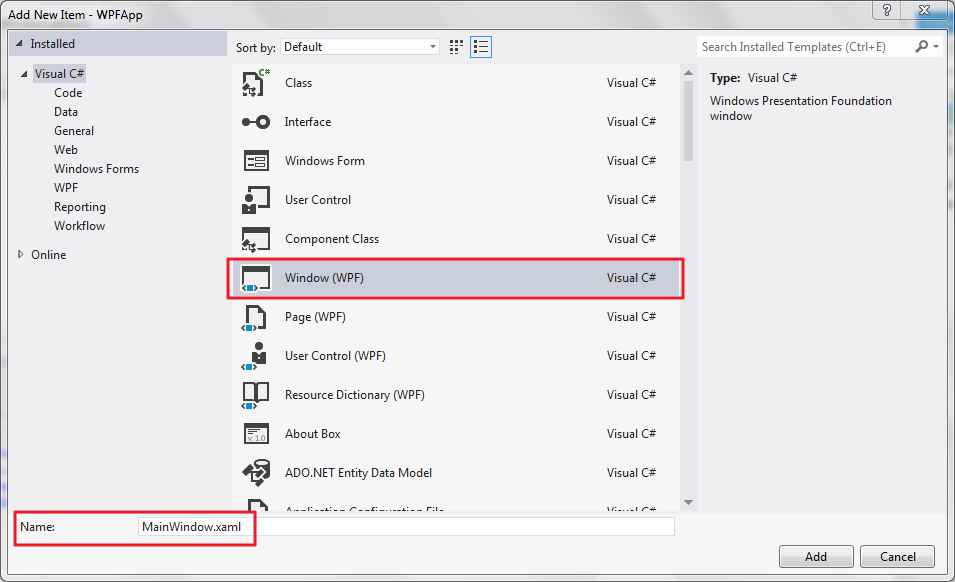
When we create new WPF application then this will add default MainWindow.xaml window but you can add new Window by right click the project name in the solution explorer and select Add=>New Item. The Add New Item dialog box appears, as shown in below screenshot.
Click the Add button in the Add New Item dialog box to add the new WPF window named “NewWindow.xaml” in the WPF Window application.
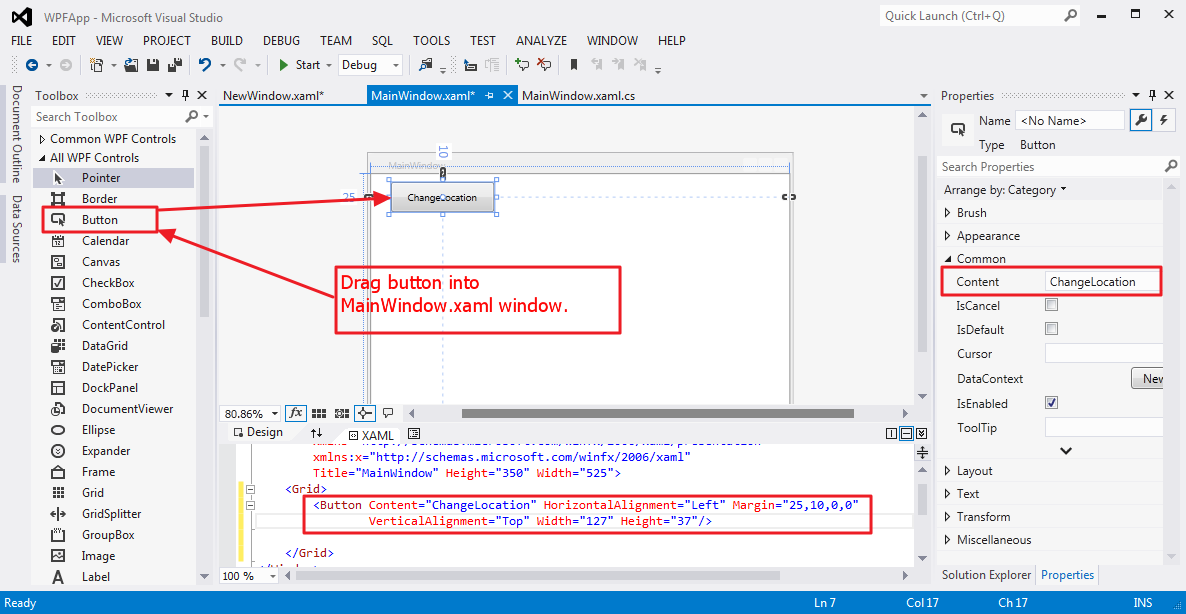
Now, add five buttons named AutoFit, NewWindow, ChangeLocation, ChangeBorder and Exit in the designer view of MainWindow (MainWindow.xaml file) and set its properties as shown below xaml code.
<Window x:Class="WPFApp.MainWindow"
   xmlns="http://schemas.microsoft.com/winfx/2006/xaml/presentation"
   xmlns:x="http://schemas.microsoft.com/winfx/2006/xaml"
   Title="MainWindow" Height="350" Width="525">
   <Grid>
         <Button Name="ChangeLocation" Content="ChangeLocation" HorizontalAlignment="Left" Margin="25,10,0,0" VerticalAlignment="Top" Width="127" Height="37"/>
         <Button Name="AutoFit" Content="AutoFit" HorizontalAlignment="Left" Margin="25,64,0,0" VerticalAlignment="Top" Width="127" Height="38"/>
         <Button Name="NewWindow" Content="NewWindow" HorizontalAlignment="Left" Margin="25,121,0,0" VerticalAlignment="Top" Width="127" Height="33"/>
         <Button Name="ChangeBorder" Content="ChangeBorder" HorizontalAlignment="Left" Margin="25,172,0,0" VerticalAlignment="Top" Width="127" Height="36"/>
         <Button Name="Exit" Content="Exit" HorizontalAlignment="Left" Margin="25,226,0,0" VerticalAlignment="Top" Width="127" Height="36"/>
   <Grid>
   </Grid>
</Window>
…after adding five buttons the window looks like as shown in below screenshot and the XAML code look as shown above code.
In above code, the Title property of MainWindow (the default window) is set to FirstWindow and the Height and Width properties are set to 525.
You can also see that the MainWindow.xaml code-behind file (MainWindow.xaml.cs) contains below line of code.
using System;
using System.Collections.Generic;
using System.Linq;
using System.Text;
using System.Threading.Tasks;
using System.Windows;
using System.Windows.Controls;
using System.Windows.Data;
using System.Windows.Documents;
using System.Windows.Input;
using System.Windows.Media;
using System.Windows.Media.Imaging;
using System.Windows.Navigation;
using System.Windows.Shapes;

namespace WPFApp
{
      /// <summary>
      /// Interaction logic for MainWindow.xaml
      /// </summary>
      public partial class MainWindow : Window
      {
          public MainWindow()
          {
                 InitializeComponent();
                 this.WindowStartupLocation = WindowStartupLocation.CenterScreen;
                 this.WindowState = WindowState.Maximized;
          }
      }
}
In above code, the constructor of MainWindow sets the WindowStartupLocation and WindowState properties of the current object (MainWindow). The WindowStartupLocation property of MainWindow is set to the CenterScreen value of the WindowStartupLocation enumeration. This implies that when MainWindow appears for the first time, it appears at the center of the screen. The WindowState property is set to Maximized value of the WindowState enumeration. This implies that when MainWindow appears, it appears in its mazimized state covering the entire screen. You can set the WindowState property to Minimized or Normal.
Now, lets create event handlers for click event of the five buttons. For Example, You can add event handlers for ChangeLocation button by double click on the ChangeLocation button and this will attach event handlers to ChangeLocation button.
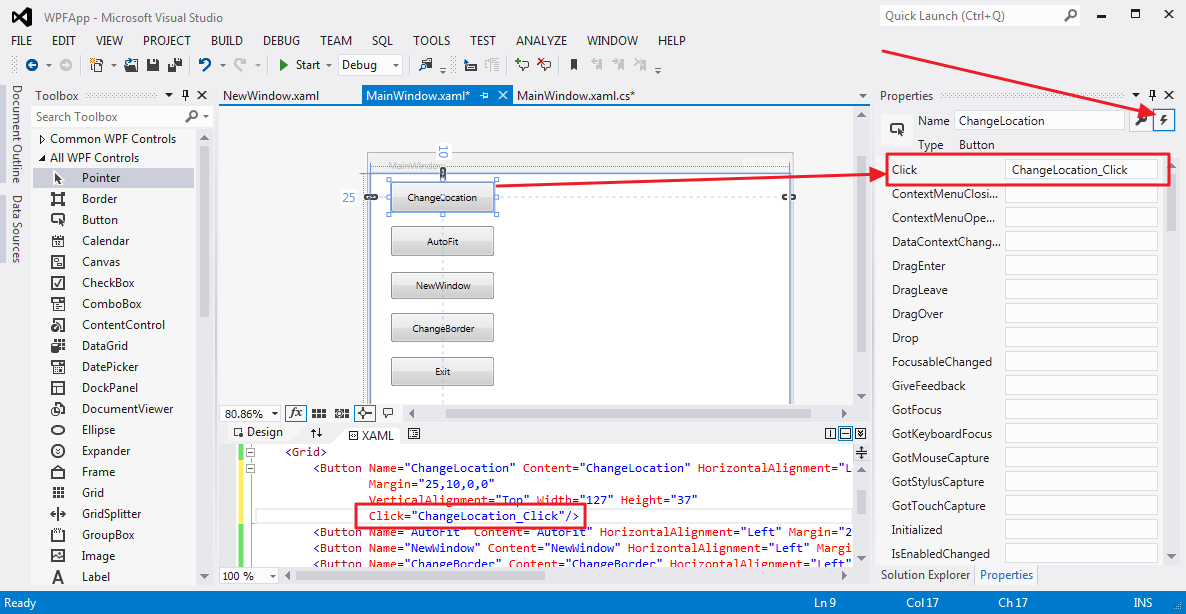
After adding click event to five buttons the code looks as shown below code.
<Window x:Class="WPFApp.MainWindow"
      xmlns="http://schemas.microsoft.com/winfx/2006/xaml/presentation"
      xmlns:x="http://schemas.microsoft.com/winfx/2006/xaml"
      Title="MainWindow" Height="350" Width="525">
      <Grid>
         <Button Name="ChangeLocation" Content="ChangeLocation" HorizontalAlignment="Left"
             Margin="25,10,0,0"
             VerticalAlignment="Top" Width="127" Height="37"
             Click="ChangeLocation_Click"/>
         <Button Name="AutoFit" Content="AutoFit" HorizontalAlignment="Left" Margin="25,64,0,0" VerticalAlignment="Top" Width="127" Height="38" Click="AutoFit_Click"/>
         <Button Name="NewWindow" Content="NewWindow" HorizontalAlignment="Left" Margin="25,121,0,0" VerticalAlignment="Top" Width="127" Height="33" Click="NewWindow_Click"/>
         <Button Name="ChangeBorder" Content="ChangeBorder" HorizontalAlignment="Left" Margin="25,172,0,0" VerticalAlignment="Top" Width="127" Height="36" Click="ChangeBorder_Click"/>
         <Button Name="Exit" Content="Exit" HorizontalAlignment="Left" Margin="25,226,0,0" VerticalAlignment="Top" Width="127" Height="36" Click="Exit_Click"/>

     </Grid>
</Window>
Now, add the below code to write the event handlers of the click event of the five buttons in the code-behind file (MainWindow.xaml.cs).
using System;
using System.Collections.Generic;
using System.Linq;
using System.Text;
using System.Threading.Tasks;
using System.Windows;
using System.Windows.Controls;
using System.Windows.Data;
using System.Windows.Documents;
using System.Windows.Input;
using System.Windows.Media;
using System.Windows.Media.Imaging;
using System.Windows.Navigation;
using System.Windows.Shapes;

namespace WPFApp
{
      /// <summary>
      /// Interaction logic for MainWindow.xaml
      /// </summary>
      public partial class MainWindow : Window
      {
            public MainWindow()
            {
                InitializeComponent();
                this.WindowStartupLocation = WindowStartupLocation.CenterScreen;
                this.WindowState = WindowState.Maximized;
            }

            private void ChangeLocation_Click(object sender, RoutedEventArgs e)
            {
                this.WindowState = WindowState.Normal;
                this.Top = 200;
                this.Left = 200;
            }

            private void AutoFit_Click(object sender, RoutedEventArgs e)
            {
                this.SizeToContent = SizeToContent.Width;
            }

            private void NewWindow_Click(object sender, RoutedEventArgs e)
            {
                this.Hide();
                NewWindow newwin = new NewWindow();
                newwin.Show();
            }

            private void ChangeBorder_Click(object sender, RoutedEventArgs e)
            {
                this.WindowStyle = WindowStyle.ThreeDBorderWindow;
            }

            private void Exit_Click(object sender, RoutedEventArgs e)
            {
                App.Current.Shutdown();
            }
      }
}
In the ChangeLocation_Click() method, the WindowState property is set to a different value Normal. In addition, the Top and Left properties of MainWindow are set to 200. This implies that when you click the ChangeLocation button, MainWindow is restored to normal state and displayed 200 units right and 200 units below the upper-left corner of the screen.
If you want MainWindow to resize according to the content that it holds, then you can click the AutoFit button. This calls the AutoFit_Click() method in which the SizeToContent property of MainWindow is set to the Width value of the SizeToContent enumeration. MainWindow then automatically resizes only its Width to fit the content.
In the ChangeBorder_Click() method, the WindowStyle property of MainWindow is set to the ThreeDBorderWindow value of the WindowStyle enumeration.
In the NewWindow_Click() method, MainWindow is hidden by calling the Hide() method. In addition, an instance (newwin) of NewWindow is created and displayed using Show() method.
Finally, in the Exit_Click() method, the application is shut down by calling the shutdown() method.
Now, Run the Application by pressing F5 keyboard shortcut and you can see output as shown in below screenshot.
